You can create homemade ice cream cones that taste just like they came from a shop. With ice cream waffle cone maker tools, you get crisp results every time. Waffle cone makers let you enjoy golden-brown ice cream cones at home. Making the perfect waffle cone feels fun and lets you customize your homemade ice cream.
Waffle Cone Makers and Essential Tools

Choosing the Best Ice Cream Waffle Cone Maker
You want your cones to turn out crispy and golden every time. Picking the right ice cream waffle cone maker makes a big difference. Look for machines with strong power, adjustable temperature, and easy-to-clean surfaces. Some models heat up fast and let you control how brown your cones get. Stainless steel and non-stick coatings help you clean up quickly. Here’s a quick look at what to check:
| Technical Factor | What to Look For |
|---|---|
| Power and Efficiency | Higher wattage (750W–2400W) for faster, even cooking |
| Temperature Control | Adjustable settings for perfect crispiness |
| Size and Capacity | Compact for home, larger for more cones |
| Material Quality | Stainless steel, non-stick, safe handles |
| Ease of Cleaning | Removable plates, smooth surfaces |
Some popular waffle cone makers, like the Proctor Silex and Brentwood models, offer easy browning controls and safe, nonstick plates. If you want the best tool for homemade ice cream, choose a machine that matches your needs and kitchen space.
Must-Have Accessories for Making the Perfect Waffle Cone
You can make cone making easier and more fun with the right equipment. Experts suggest using a few key accessories to help you roll, shape, and store your cones. Here are some must-haves:
- Rolling papers for shaping cones
- Pre-rolled cones for quick use
- Filter tips for a clean finish
- Wraps for extra flavor
- Grinders for even texture
You can also find custom packaging and branded accessories if you want to get creative. Check out this chart to see how many accessory types experts recommend for efficient cone making:

Key Ingredients for Professional-Quality Cones
Great cones start with great ingredients. Always pick fresh, natural items and skip artificial dyes or flavors. Culinary experts say the quality of your cones depends on what you put in the batter. Clean label ingredients help you get that professional taste and crunch. When you use the right ingredients, your cones will taste just like the ones from your favorite shop.
Making the Perfect Waffle Cone at Home
Step-by-Step Batter Preparation
You want your batter to be smooth and lump-free. Start by measuring your ingredients carefully. Use a high-performance blender if you have one. These blenders mix both wet and dry ingredients quickly and evenly. You get a silky batter that cooks up crisp and golden. Many bakers use blenders with at least 1000 watts for the best results. They also clean up fast, so you spend less time washing and more time enjoying homemade ice cream.
When you combine your ingredients, add the liquids first, then the dry ones. Mix until you see no lumps. Studies show that the right mix of flour and water makes a big difference. Researchers tested different ratios and found that the right balance gives you cones that are crisp, not too hard, and taste great. They used special tests and taste panels to check their results. The best recipes matched what people liked most. You can trust that careful mixing and measuring will help you get the perfect cone every time.
Tip: Let your batter rest for 10–15 minutes before cooking. This helps the flour absorb the liquid and gives you a smoother texture.
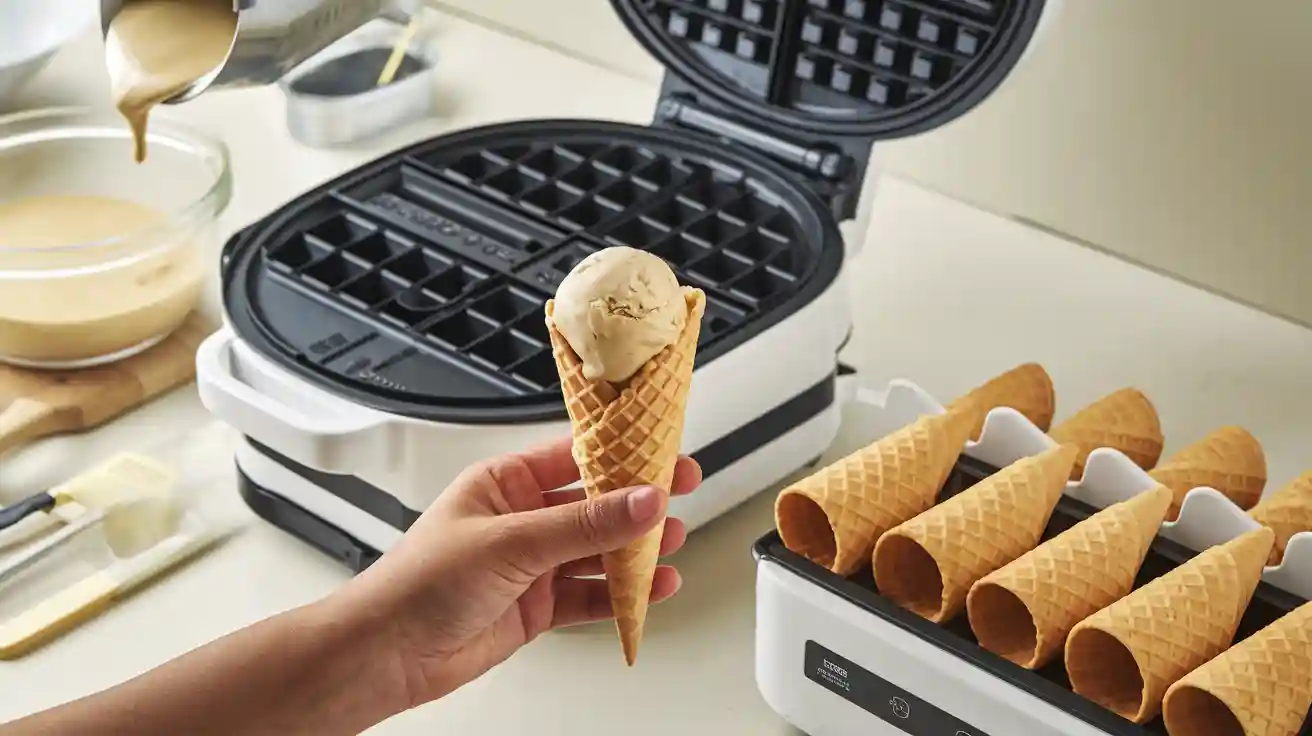
Using Waffle Cone Makers for Best Results
Plug in your waffle cone maker and let it heat up. Most machines have a light that tells you when they are ready. Pour a small amount of batter onto the center of the plate. Close the lid and press gently. Cook for about 1–2 minutes, or until the cone turns golden brown.
If you want to make the perfect waffle cone, keep an eye on the color. Adjust the temperature if your cones cook too fast or too slow. Some machines let you set the browning level. Try a few test cones to find your favorite setting. You will soon get a feel for how much batter to use and how long to cook each cone.
Shaping, Cooling, and Storing Your Cones
Once your cone is cooked, work quickly. Use a cone roller to shape it while it is still warm and flexible. Hold the seam down for a few seconds so it sticks. Place the shaped cone on a rack to cool. This keeps it crisp.
Proper cooling and storage are key for crispness. If you store cones in a humid place, they get soft. Keep them in an airtight container once they are cool. Store them at room temperature, away from moisture. Here is a table that shows how temperature and humidity affect crispness:
| Storage Method | Temperature Range | Relative Humidity | Crispness After 24 Hours |
|---|---|---|---|
| Room Cooling | 68–72°F (20–22°C) | 40–50% | Very Crisp |
| Refrigerator | 35–40°F (2–4°C) | 60–70% | Slightly Soft |
| Freezer | 0°F (-18°C) | 50–60% | Loses Crispness |
| Humid Environment | 75–80°F (24–27°C) | 80–90% | Soft and Chewy |
Note: Always let your cones cool completely before storing. Warm cones in a closed container will trap steam and make them soggy.
Classic Waffle Cone Recipe and Flavor Tips
You can make a classic cone with just a few ingredients. Here is a simple recipe:
- 2 large eggs
- 1/2 cup granulated sugar
- 1/4 cup unsalted butter, melted
- 1/4 cup milk
- 1/2 teaspoon vanilla extract
- 1/3 cup all-purpose flour
- Pinch of salt
Whisk eggs and sugar until light. Add melted butter, milk, and vanilla. Stir in flour and salt until smooth. Let the batter rest, then cook as described above.
Want to try new flavors? You can add cocoa powder, cinnamon, or even fruit powders. Studies show that adding rosehip powder to your recipe can boost fruity aroma and taste. In one test, cones with 3.7% and 5.6% rosehip powder scored highest for taste and overall acceptability. The texture stayed crisp, and the flavor improved. You can experiment with small batches to find your favorite twist.
| Recipe Variation | Rosehip Powder (%) | Taste Score (out of 9) | Acceptance Rate (%) | Texture Change |
|---|---|---|---|---|
| Classic (Control) | 0 | 8.1 | 90 | None |
| Fruity (Rosehip) | 3.7 | 8.4 | 93 | None |
| Fruity (Rosehip) | 5.6 | 8.4 | 93 | None |
| Fruity (Rosehip) | 7.5 | 7.9 | 88 | None |
You can also look at gluten-free recipes. Some bakers use carrot powder or special syrups. Scientists use special tests to find the best ingredient levels for color, crispness, and taste. You can use these ideas to make your own recipe for homemade ice cream cones.
Troubleshooting and Creative Customization
Sometimes, things do not go as planned. Maybe your cones crack, turn out too soft, or have holes. You can use some simple tools to find the problem. Here is a table that shows what to check:
| Tool | What It Helps With |
|---|---|
| Check Sheet | Tracks how often you see cracks or holes |
| Process Flow Chart | Shows where in the recipe process things go wrong |
| Histogram | Checks if your cones are all the same size |
| Pareto Chart | Finds the most common problems |
| Cause and Effect Chart | Helps you see if mixing, pouring, or rolling is the issue |
If your cones are too soft, check your storage. If they crack, try rolling them while they are warmer. If you want to get creative, dip the edges in chocolate or sprinkle with nuts. You can even shape cones into bowls or mini cones for parties.
Tip: Try crafting your own homemade ice cream to fill your cones. You can match flavors and textures for a special treat.
Making the perfect waffle cone at home is fun and rewarding. You get to control every part of the recipe. You can make cones that are crisp, tasty, and just right for your homemade ice cream. Try new flavors, fix small problems, and enjoy the process. You will soon become an expert at homemade ice cream cones.
You can make professional ice cream cones at home with simple tools and fresh ingredients. Homemade cones let you pick your sweetener, so you avoid the extra sugar found in store-bought cones. Try new flavors, shapes, and toppings. Making cones is a fun family activity that everyone will enjoy.
FAQ
How do you keep waffle cones crispy?
Store your cones in an airtight container at room temperature. Let them cool completely before sealing. Avoid humid places to keep that perfect crunch.
Can you make gluten-free waffle cones?
Yes! You can use gluten-free flour blends. Many people like rice flour or almond flour. Try small batches to find your favorite texture.
What should you do if your cones break while rolling?
- Roll the cone while it is still warm.
- Use a cone roller for even pressure.
- If it cracks, press gently to seal the seam.