Skip to content
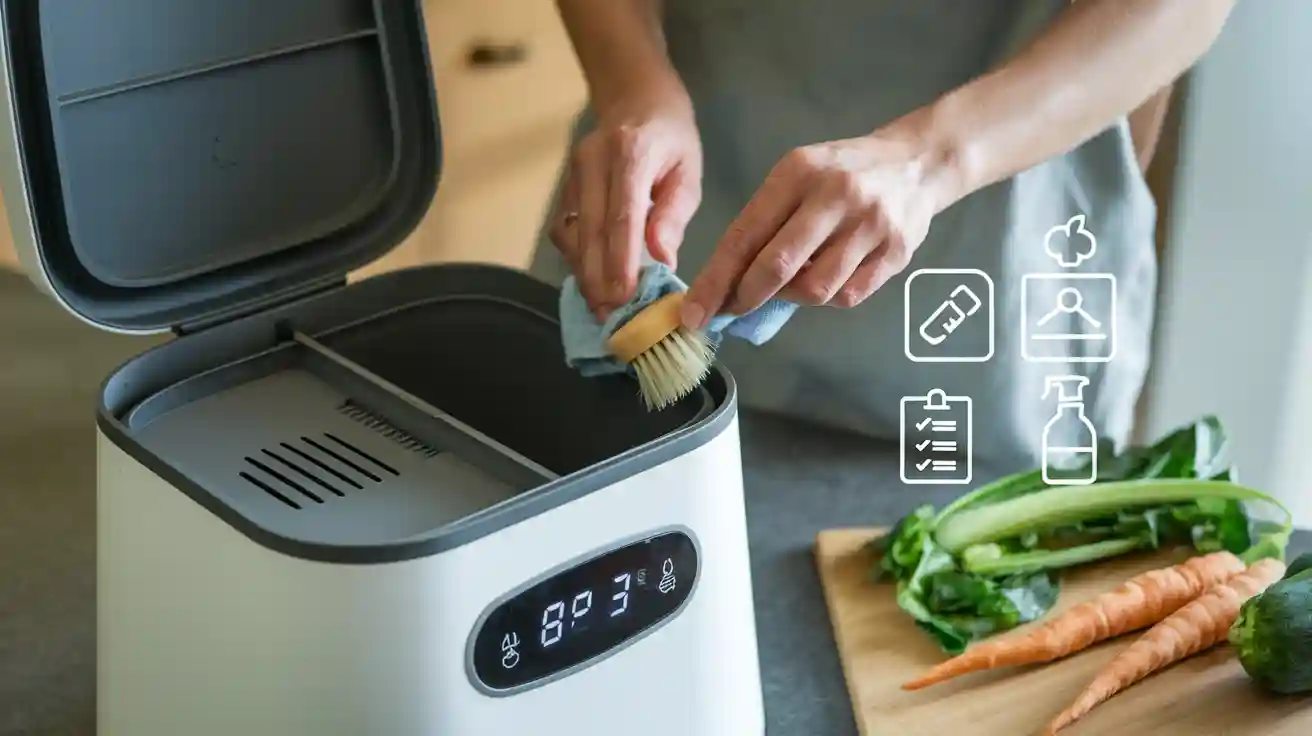
You want your electric composting bin to work smoothly every day. Simple habits make a big difference. Clean up spills as soon as you spot them. > Tip: Wipe the bin’s lid to keep it fresh. Good care helps you avoid problems and keeps your composting easy.
Daily and Weekly Electric Composting Bin Care
Emptying and Cleaning the Bin
You want your electric composting bin to stay fresh and work well. Make it a habit to empty the bin every day or at least every other day. This keeps food scraps from piling up and stops bad smells before they start. When you empty the bin, wipe down the inside and outside with a damp cloth. Pay special attention to the lid and corners, where bits of food can hide.
Tip: If you see any spills or sticky spots, clean them right away. This helps prevent mold and keeps your bin looking new.
A quick clean each week with mild soap and water removes buildup. Avoid harsh chemicals because they can damage the bin’s sensors and parts. If your bin has a removable bucket, take it out and wash it in the sink. Dry all parts before putting them back together.
Managing Compost Materials
Choosing the right materials makes your electric composting bin work better and last longer. Not all food scraps belong in the bin. Some items can cause clogs, damage, or even stop the composting process. Here’s a handy table to help you decide what to add and what to skip:
| Suitable Compost Materials | Unsuitable Compost Materials | Extra Tips |
|---|---|---|
| Fruits, vegetables, meat, fish, chicken, cooked eggs, grains, nuts, legumes, coffee grounds, cheese, bread, cookies, noodles, stems, roots, rinds | Hard bones, shells, tough husks, fruit pits, cooking oil, disposable tableware, glass, metal, medicine, cigarette, paper tape, plastic, rubber | Drain extra liquid from soup-like waste. Use less salt in food scraps. |
If you use the wrong materials, your electric composting bin may clog or break down. Plastics, metals, and other non-food items can block the system and wear out the parts. This means more repairs and higher costs. Always sort your scraps before adding them.
- Most bins handle fruits, veggies, coffee grounds, and eggshells.
- Some advanced models can process meat or certain plant-based plastics.
- Adding an organic starter boosts the nutrients in your compost.
Note: If you skip sorting, you might end up with poor-quality compost and more trash going to the landfill.
Monitoring Odor and Moisture
Nobody likes a smelly kitchen. You can keep odors under control with a few simple steps. First, empty your electric composting bin often. This stops bacteria from growing and making bad smells. Use a charcoal filter if your bin has one. It traps odors and keeps the air fresh.
Here are some easy ways to manage odor and moisture:
- Drain any liquid (leachate) from the bin to stop smells.
- Place the bin in a cool spot, away from sunlight.
- Line the bottom with newspaper to soak up extra moisture.
- Sprinkle a little baking soda inside to trap odors.
- Stir the compost now and then to let air in.
- Keep the lid closed tight.
Moisture matters, too. If your scraps are too wet, the bin can get soggy and smelly. If they’re too dry, composting slows down. The best moisture level for composting is between 50% and 70%. Most electric composting bins dry out scraps to make them safe to store, but you still need to watch for too much liquid. If you see puddles, add dry scraps like bread or paper towels.
Tip: If you can’t empty the bin right away, freeze your food waste until you’re ready. This keeps smells away and makes composting easier.
Monthly and Seasonal Electric Composting Bin Maintenance
Deep Cleaning Steps
Every month, your electric composting bin needs a deep clean. Start by unplugging the bin and removing all compost. Wash the inside with warm, soapy water. Use a soft brush to scrub away any stuck food or buildup, especially on the blades. Rinse and dry all parts before putting them back. Add a microbial supplement once a month to boost composting power. This step keeps your compost fresh and helps the machine work better.
Tip: Always dry every part before reassembling. Moisture left inside can cause odors or slow down composting.
Cleaning Filters and Sensors
Filters and sensors keep your bin running smoothly. Replace the activated carbon filter every 4-6 months, depending on how often you use the bin. If you use it more than three times a week, check the filter sooner. Wipe the sensors and inside walls after each composting cycle. This stops dirt from blocking the sensors and keeps odors away. Clean the blades with a soft brush to remove any stuck scraps.
- Change the filter regularly for fresh air.
- Wipe sensors and blades to keep the bin working well.
Inspecting for Wear and Tear
Seasons change, and so do your composting needs. Hot summers and cold winters affect how your electric composting bin works. You should check for cracks, loose wires, or worn-out parts every season. Look at the power cord and lid for damage. Some bins have smart features that adjust to weather, but you still need to watch for problems.
- Temperature and moisture changes can speed up or slow down composting.
- Solar-powered bins and smart sensors help, but you should still monitor the bin’s temperature and moisture.
- Adjust what you put in the bin as the seasons change.
Note: Regular checks help you catch small problems before they become big repairs.
Electric Composting Bin Troubleshooting and Prevention
Common Issues and Solutions
You might run into a few problems with your electric composting bin, but most have easy fixes. Here’s a quick table to help you spot and solve the most common issues:
| Issue | Why It Happens | What You Can Do |
|---|---|---|
| Bad odors | Wrong items, too much moisture, not enough cleaning | Skip bones, meat, oils; add sawdust or baking soda; empty and rinse often; swap filters |
| Slow composting | Not enough microbes, wrong moisture, low fill | Keep scraps above the fill line; add microbe packs; chop scraps smaller |
| Machine damage | Hard items like bones or plastics | Sort scraps carefully; never add hard or plastic items |
| Moisture issues | Too wet or too dry scraps | Mix wet and dry scraps; add paper towels or sawdust for balance |
| Odor control | Old filter, not enough cleaning | Replace filter every 4-6 months; keep plugged in for odor control |
| Maintenance lapses | Skipping cleaning or filter changes | Clean after each cycle; replace filter regularly; add microbe packs monthly |
Tip: Clean the blades with a soft brush and let all parts dry before reassembling.
Preventing Mold, Pests, and Malfunctions
You can stop mold and pests before they start. Try these steps:
- Mix “greens” like veggie scraps with “browns” like dry leaves or cardboard. This keeps moisture just right.
- Chop scraps into small pieces. This helps air move and speeds up composting.
- Keep the compost damp, not soggy. It should feel like a wrung-out sponge.
- Turn or stir the compost every week or two. This adds air and keeps mold away.
- Use a bin with a tight lid and base. This blocks pests from getting inside.
- Avoid adding meat, dairy, or bones. These attract bugs and rodents.
- Replace the carbon filter every few months to keep smells down.
Note: Regular checks and good habits keep your electric composting bin running smoothly and pest-free.
Best Practices for Electric Composting Bin Longevity
Choosing the Right Compost Materials
You want your electric composting bin to last for years. Start by picking the right kitchen scraps. Not everything belongs in your bin. Some items can cause jams, bad smells, or even damage the machine. Here’s what you should avoid:
- Sticky, sugary, or high-fiber foods (these can jam the blades)
- Pet waste (it may carry harmful bacteria)
- Plastic, glass, or metal
- Colored or glossy paper
- Diseased plants or weeds
- Dairy, meat, bones, and fish scraps
- Cooking oils and fats
- Coal or charcoal ash
- Citrus peels
Mix fruit and veggie scraps with coffee grounds for best results. If you notice the blade getting stuck, try the self-clean mode with water to loosen things up.
Tip: Mixing different types of scraps helps keep the compost moving and prevents clogs.
Avoiding Overloading and Misuse
You might feel tempted to fill your bin to the top, but overloading can cause trouble. Too much food at once can slow down composting or even break the machine. Always check the fill line before adding more scraps. Chop large pieces into smaller bits so the bin can process them faster.
- Never force the lid shut.
- Don’t add more scraps if the bin is already full.
- Use the bin’s self-clean mode if you notice any jams.
A little care goes a long way. Your electric composting bin will thank you with smooth, trouble-free composting.
Following Manufacturer Recommendations
Every electric composting bin comes with its own set of rules. Read the manual and follow the care tips from the maker. They know what works best for your model. Clean the filters and sensors as suggested. Replace parts when needed. Stick to the recommended cleaning schedule.
Note: Following these steps keeps your warranty safe and your composting bin running strong.
You keep your electric composting bin running strong when you follow a simple routine.
- Change the charcoal filter every six months to keep things fresh.
- Swap filters every few months, just like experts suggest.
Stick to these habits. Your composting stays easy, and your bin lasts for years.
FAQ
How often should you clean your electric composting bin?
You should wipe it daily and deep clean it once a month. This keeps your bin fresh and working well.
Can you compost citrus peels in your electric bin?
You should skip citrus peels. They can slow down composting and cause bad smells.
What should you do if your bin smells bad?
Try emptying the bin, cleaning it with mild soap, and changing the filter. Baking soda can help with odors, too.