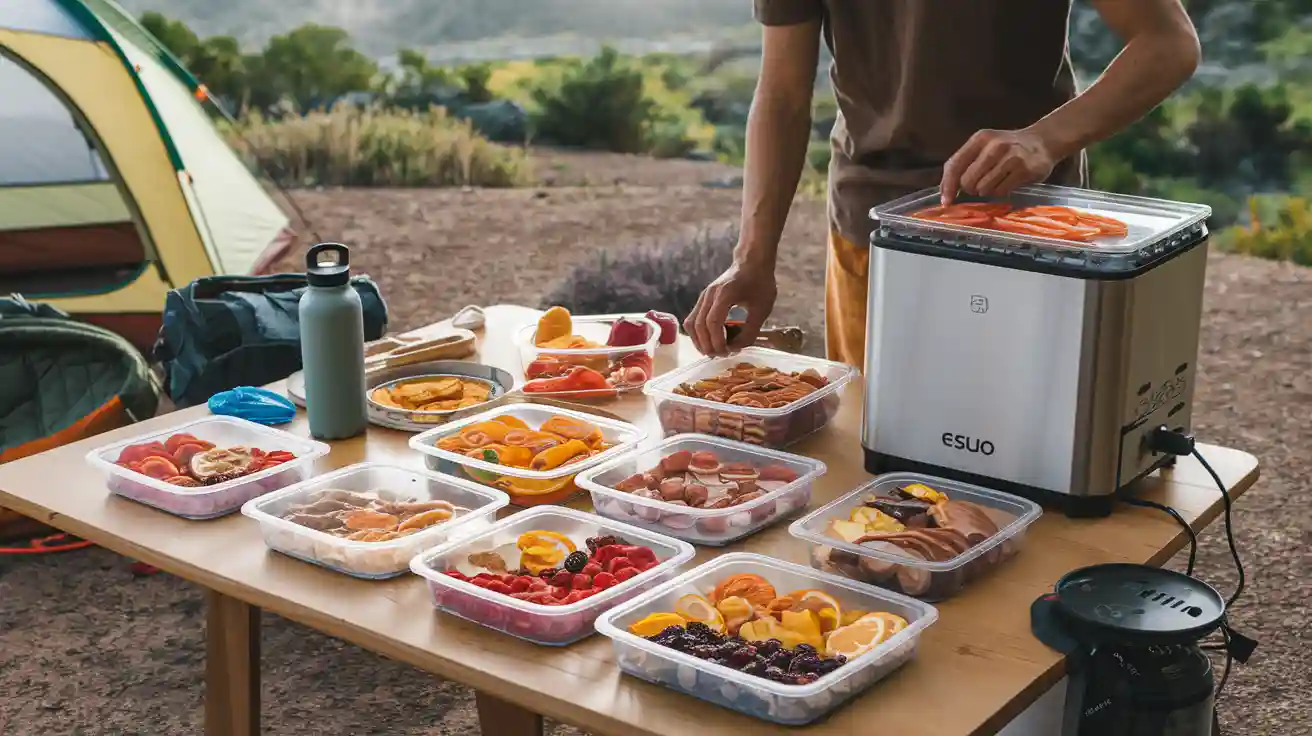
Dehydrated camping food lets you pack light, eat well, and meet your dietary needs. Use these tips for homemade meals: always cook ingredients before drying, slice food evenly, and follow the 10 tips for using a food dehydrator. Safe temperatures and proper storage keep your homemade dehydrated meals fresh.
Dehydrated Camping Food: Why It’s Ideal for the Trail
Lightweight and Space-Saving Benefits
When you pack for a camping trip, every ounce matters. Dehydrated camping food helps you save weight and space in your backpack. Most of the weight in fresh or canned food comes from water. By removing water, dehydrated meals become 70% to 90% lighter than their fresh or canned versions. You can fit more meals and recipes in your pack, leaving room for other gear. The flat, sealed packaging also prevents spills and makes stacking easy. Campers often choose dehydrated food because it is compact and simple to carry, especially when you need to travel light.
- Dehydrated food is lighter than canned food.
- It takes up less space in your bag.
- You can pack more meals for longer trips.
Long Shelf Life and Easy Storage
Dehydrated camping food lasts much longer than fresh food. The shelf-life of dehydrated food can range from 6 months to 2 years with proper storage. If you keep your meals in airtight containers and store them in a cool, dry place, you can extend their freshness. Removing moisture also lowers the risk of foodborne illness, which is important when you do not have a refrigerator. The shelf-life of dehydrated food makes camping meal planning easier because you can prepare your favorite dehydrated camping meals ahead of time.
| Food Type | Average Shelf Life | Storage Tips |
|---|---|---|
| Dehydrated meals | 6 months – 2 years | Airtight, cool, dry, dark location |
Simple Prep for Dehydrated Backpacking Meals
Dehydrated backpacking meals make cooking at camp quick and easy. You only need to add boiling water and wait about 10–30 minutes. This saves you time and reduces cleanup. You do not need to chop or cook ingredients at camp. Many campers enjoy trying new recipes and creating their own meals at home. Favorite dehydrated camping meals can be ready with little effort, letting you spend more time exploring and less time cooking.
ESIUO Food Dehydrator: Key Features for Dehydrating
Essential Functions and Controls
When you use the ESIUO food dehydrator, you get precise control over the dehydrating process. The digital control panel lets you set the exact temperature for each type of food. This helps you preserve nutrients and texture while drying fruits, vegetables, or meats. You can use the programmable timer to set the right drying time, so you do not have to watch the dehydrator all day. The automatic shutoff keeps your food safe and prevents over-drying.
The ESIUO dehydrator uses advanced airflow technology. This system moves air evenly across all trays, so you do not need to rotate them. You get consistent results every time you dehydrate. The trays are easy to remove and clean, and you can put them in the dishwasher. The energy-saving design means you can run the food dehydrator overnight without using too much electricity. The quiet fan lets you dehydrate food even in open kitchens or while you sleep.
Tip: Always slice your food evenly and arrange it in a single layer on each tray. This helps the dehydrator dry everything at the same rate.
Safe Setup and Initial Checks
Before you start dehydrating, check that your food dehydrator sits on a flat, stable surface. Plug it into a safe outlet away from water. Make sure the trays and drip trays are clean and dry. Stack or slide the trays into place, leaving space for air to move. Set the temperature and timer based on the food you are drying. Watch for any error messages on the digital panel.
You should check the fan vents and filters for dust or blockages. Clean them if needed. This keeps the airflow strong and helps the dehydrator work well. Always read the manual before your first use. Following these steps helps you dehydrate food safely and get the best results every time.
Step-by-Step Guide to Homemade Dehydrated Meals
Selecting Foods for Dehydrating
You want to choose the best foods for dehydrating when planning your camping meals. Some foods work better than others in a food dehydrator. Here are the top choices:
- Fruits (apples, bananas, berries, mangoes)
- Vegetables (carrots, peas, corn, bell peppers)
- Legumes (beans, lentils)
- Grains, rice, and pasta
- Low-fat meats and seafood (chicken breast, lean beef, fish)
- Herbs (parsley, basil, cilantro)
- Sauces that do not contain fat, dairy, or eggs
Avoid dehydrating high-fat foods like nut butters, avocados, olives, and fatty meats. Dairy products and eggs can spoil or cause food safety issues. Many store-bought condiments contain fats or eggs, so skip those as well. Always check that your chosen foods can dry safely and store well for your homemade dehydrated meals.
Tip: When you make full dehydrated meal recipes, keep the ingredients low in fat. Add cheese or oils later during rehydration at camp.
Prepping, Cooking, and Slicing Ingredients
Proper preparation helps you get the best results from your food dehydrator. Start by washing your hands and cleaning your work area. Wash all fruits and vegetables well. For fruits, soak slices in lemon juice or ascorbic acid to prevent browning. Blanch vegetables in boiling water or steam to keep their color and flavor.
Slice all ingredients evenly. Use a mandoline or a sharp knife to cut fruits and vegetables into pieces about 1/4 to 1/2 inch thick. Thinner slices dry faster and more evenly. For meats, trim off all fat and connective tissue. Cut meat into 1/4 inch strips. Marinate or brine meats to add flavor, then pat them dry before placing them on trays.
Note: Uniform slicing is key. Even pieces dry at the same rate, which prevents spoilage and improves the quality of your homemade dehydrated food.
Arranging Food Evenly on ESIUO Trays
How you arrange food on the trays affects how well it dries. Place food in a single layer on each tray. Do not let pieces overlap or touch. This allows air to move freely around every piece. For small or sticky foods, use mesh screens to keep them from falling through the tray vents.
- Turn large pieces halfway through drying.
- Move pieces near the tray edges to the center for even drying.
- Stir small pieces every 1-2 hours to separate any that stick together.
- Rotate trays if your dehydrator does not have horizontal airflow.
Avoid overcrowding the trays. Leave space between pieces to help air circulate. This step is important in any guide to dehydrating food.
Setting Temperatures and Dehydrating Times
Each type of food needs a specific temperature for safe and effective drying. Set your food dehydrator to the right temperature for what you are drying:
| Food Type | Temperature (°F) | Notes |
|---|---|---|
| Herbs | 95 | Dry leaves loosely |
| Vegetables | 125 | Blanch before drying |
| Fruits | 135 | Pretreat to prevent browning |
| Meats | 160-165 | Trim fat, marinate, pat dry |
Always follow the manufacturer’s instructions for your ESIUO dehydrator. Do not increase the temperature to speed up drying. High heat can cause case hardening, which traps moisture inside and leads to spoilage. If you want to dry food faster, cut it into smaller pieces or reduce the amount loaded on the trays.
Callout: Set the timer on your food dehydrator based on the food type and slice thickness. Check the progress regularly.
Monitoring Progress and Testing for Doneness
You need to check your food often during the drying process. Look for these signs to know when your food is ready:
- Fruits and herbs should feel leathery but not sticky.
- Vegetables should be brittle or crisp.
- Meats must be completely dry with no pink inside.
Test a few pieces from different trays. Let them cool before checking texture. If you find any spongy or sticky spots, return the food to the dehydrator for more drying.
After drying, condition your homemade dehydrated meals by placing them in airtight containers for 3 to 7 days. Shake the containers daily and check for moisture. If you see condensation, put the food back in the dehydrator. This step helps ensure your diy dehydrated meals stay safe and last longer.
Tip: Always dry similar foods together. For example, dry fruits with fruits and vegetables with vegetables. This keeps drying times and temperatures consistent and prevents cross-contamination.
This step-by-step guide to dehydrating food helps you create safe, tasty, and lightweight meals for your next adventure. With practice, you will master how to dehydrate and store homemade meals for any trip.
Best Practices for Dehydrated Backpacking Meals
Dehydrating Meats and Proteins Safely
You need to follow strict safety steps when dehydrating meats and proteins for your dehydrated backpacking meals. Bacteria can grow quickly in meats if you do not handle them properly. Always start by cleaning your hands, knives, cutting boards, and countertops. Use lean meats and cut them into small strips or pieces. Fatty meats spoil faster and can make your food unsafe for camping.
Follow these steps for safe dehydrating:
- Sanitize all work surfaces and tools before you begin.
- Choose lean meats and cut them into thin strips.
- Set your dehydrator to at least 145°F (63°C) for drying meats.
- Check that meats are hard and crumbly when finished.
- Let meats cool completely before storing to avoid moisture buildup.
- Store dried meats in airtight, vacuum-sealed containers.
- Label each container with the contents and date.
- Keep your dried meats in a cool, dark place.
Tip: Always check that your meats are fully dry before packing them for your trip. Moisture can cause spoilage and ruin your dehydrated camping food.
Dehydrating Vegetables for Camping
Dehydrating vegetables helps you make lightweight, healthy meals for the trail. You keep more nutrients and flavor when you use the right methods. Start by steaming vegetables like carrots, broccoli, and green beans. Steaming helps keep their color and texture. Cut all vegetables into even pieces, about 1/4 to 1/2 inch thick, so they dry at the same rate.
- Spread vegetables in a single layer on each tray. Do not overload the trays.
- Use nonstick sheets for blended foods or sauces to prevent sticking.
- Flip blended foods near the end of drying to speed up the process.
- Keep notes on your drying times, temperatures, and preparation steps. This helps you repeat your best recipes.
- Follow temperature guidelines for each vegetable. For example, dry spinach at 125°F for 4-6 hours, carrots at 125-135°F for 6-10 hours, and broccoli at 125°F for about 8 hours.
Store your dried vegetables in vacuum-sealed bags or glass jars with oxygen absorbers. This keeps them fresh and full of flavor for your dehydrated backpacking meals.
Note: Consistent heat and steady airflow are key for safe and effective dehydrating vegetables. Use a quality dehydrator for best results.
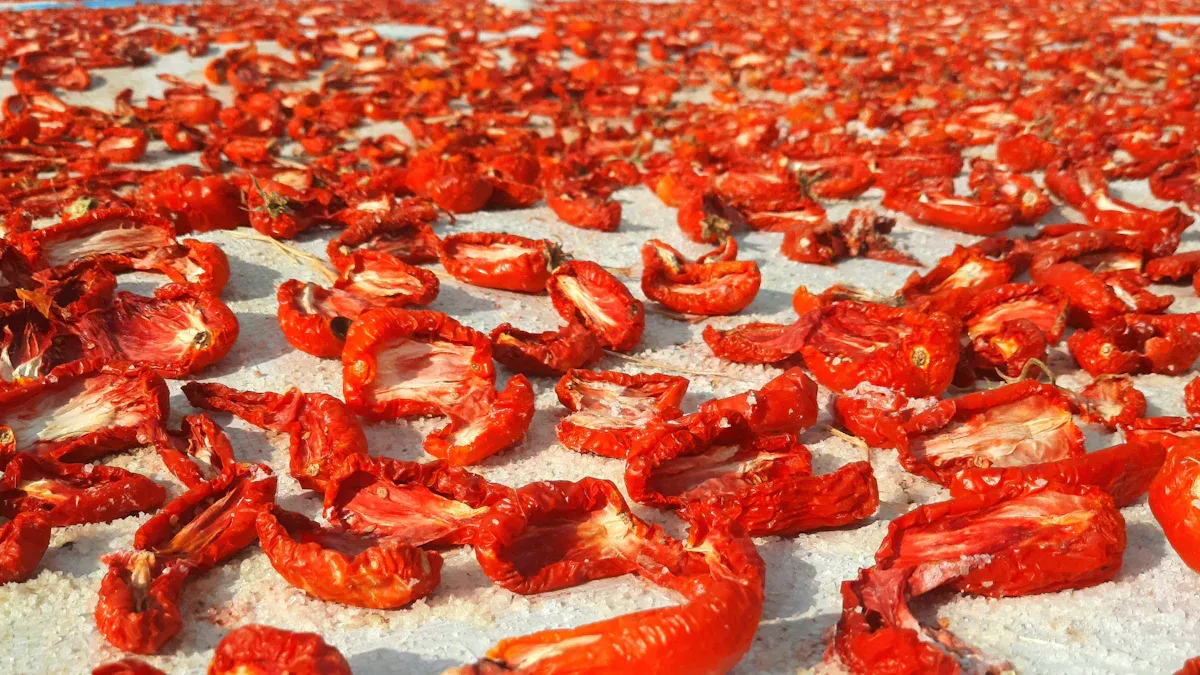
Dehydrating Fruits for Trail Snacks
Dehydrating fruit and fruit leather gives you sweet, healthy snacks for the trail. Choose fruits like bananas, apples, strawberries, blueberries, mango, pineapple, and coconut. Slice fruits evenly, about 1/4 inch thick, for even drying. You can dip apples and bananas in lemon juice to stop them from turning brown.
- Dry fruits at around 135°F to keep their color and nutrients.
- Rotate trays during drying for even results.
- Test for dryness by bending a piece. It should be pliable but not sticky. For crispy snacks like banana chips, dry longer until they snap.
- Add flavor by sprinkling cinnamon, nutmeg, or chili powder before drying.
- Store dried fruits in airtight containers in a cool, dark place.
You can mix dried fruits with nuts and seeds for trail mix or pair them with peanut butter for extra protein. These snacks are easy to pack and perfect for dehydrated backpacking meals.
Dehydrating Grains and Starches
Grains and starches like rice and pasta make your dehydrated backpacking meals filling and easy to prepare. Always cook grains fully before drying. This step saves you time and water when you rehydrate them at camp.
Follow these steps for best results:
- Use whole grain rice or pasta for more nutrients.
- Cook grains completely before drying.
- Set your dehydrator to about 125°F for drying rice and pasta.
- Make sure the temperature is high enough to remove water but not so high that it cooks the food again.
- Use a dehydrator with a fan and temperature control for even drying.
- Drying times will vary based on the size and thickness of your food. You may need to experiment to get it right.
- Store dried grains in vacuum-sealed bags to keep them fresh.
Callout: Fully cooked and dried grains rehydrate faster and taste better in your camping recipes.
Foods to Avoid Dehydrating
Some foods do not work well for dehydrated backpacking meals. High-fat foods, dairy, and some condiments can spoil quickly or do not dry properly. Here is a table to help you know what to avoid and why:
| Food Category | Reason for Avoidance | Suggested Alternatives or Notes |
|---|---|---|
| Avocados | High fat content causes rapid rancidity after dehydration | Freeze drying recommended |
| Dairy Products | High fat prevents proper moisture removal; risk of spoilage and bacteria | Freeze drying or freezing milk; special cheese recipes |
| Fatty Meats | Long drying time; risk of rancidity and food poisoning | Use lean meats for jerky; freezing or canning preferred |
| Raw Eggs | Spoil quickly; poor flavor and texture | Freeze drying or water-glassing eggs |
| Nuts | High fat content leads to quick rancidity | Store vacuum-sealed instead |
| Store-Bought Condiments | Preservatives and sugars defeat the purpose of homemade dehydrated food | Make homemade fermented versions |
| Juice | Time-consuming and messy to dehydrate | Freezing juices is faster and easier |
Safety Alert: Improper dehydrating can lead to harmful bacteria and food poisoning. Always follow safe drying and storage practices.
By following these best practices, you can create safe, tasty, and lightweight dehydrated backpacking meals for your next adventure.
Portioning, Packaging, and Labeling Dehydrated Camping Food
Portion Control for Easy Trail Meals
You want to make sure each meal is the right size for your trip. Divide your homemade meals into single servings before you pack them. This step helps you eat the right amount and keeps your camping food simple to prepare. Use a kitchen scale or measuring cups to portion out each serving. Place each portion in a separate bag or container. You can plan your meals for each day and avoid carrying extra weight.
Tip: Write down your favorite serving sizes in a notebook. This record helps you prepare the same homemade meals for your next camping adventure.
Packaging for Freshness and Portability
Good packaging keeps your homemade meals fresh and easy to carry. Use vacuum-sealed bags or heavy-duty zip-top bags to protect your food from air and moisture. These bags keep your meals safe from spoilage. Choose small, stackable containers for fragile foods like fruit chips. Always squeeze out as much air as possible before sealing. Pack your meals in the order you plan to eat them. This method saves time and keeps your backpack organized.
| Packaging Type | Best For | Benefits |
|---|---|---|
| Vacuum-sealed bags | Most meals | Long shelf life |
| Zip-top bags | Snacks, quick meals | Easy to open and reseal |
| Hard containers | Fragile foods | Prevents crushing |
Labeling and Organizing Homemade Dehydrated Meals
Label each package with the meal name, date, and any cooking instructions. Use a permanent marker or waterproof labels. This step helps you find the right meals quickly and keeps your camping trip stress-free. Store your homemade meals in a large bag or box by meal type or day. You can use color-coded bags for breakfast, lunch, and dinner. This system makes it easy to grab the meal you want without searching through your pack.
Note: Clear labels and good organization help you enjoy your homemade meals and spend more time exploring the outdoors.
Rehydrating Dehydrated Meals and Trail Cooking Tips
Fast and Effective Rehydration Methods
When you camp, you want your food ready fast. You can rehydrate your meals quickly with a few smart tricks. Start by boiling water and pouring it over your dehydrated food. Stir well, seal the bag or pot, and wrap it in a towel or jacket. This keeps the heat in and helps your food rehydrate in 10 to 15 minutes. For pasta, add boiling water, cover, and let it soak in a cozy for 8 to 12 minutes. Then, re-boil for a minute to finish. This method saves fuel and gives you soft, tasty food.
If you have time, pre-soak vegetables in purified water for 1 to 2 hours before you cook. This step makes them rehydrate faster and saves even more fuel. Do not soak leafy greens or quick grains, as they can get mushy. For meats, always use hot water. Boil the meat with water, cover, and let it soak for 30 minutes. Then, re-boil before eating to make sure it is safe. Always use clean water and keep soaking times short to prevent bacteria.
Tip: Use a small silicone spatula to scrape your pot clean after you rehydrate your meals. This makes cleanup easy and keeps your gear fresh.
Flavor Boosters and Add-Ins for Dehydrated Meals
You can make your rehydrated meals taste amazing with a few lightweight add-ins. Try adding jerky to soups or rice for extra protein and a savory kick. Dried vegetables, like mushrooms or peas, boost flavor and nutrition. Pack small containers of spices such as salt, pepper, chili flakes, or cumin. These seasonings help you rehydrate your food with more taste.
Packet soups, miso paste, and powdered cheese melt into your meals and add rich flavor. Tuna sachets and dried bean curd strips give you more protein. Crushed chips or seaweed add crunch and calories. Tortillas work as wraps or can be torn into your meals for extra energy. These boosters do not add much weight, but they make every bite better when you rehydrate your food on the trail.
Note: Mix in your flavor boosters while you rehydrate your meals to get the best taste and texture.
Troubleshooting Dehydrating Issues
Uneven Drying and Solutions
Uneven drying can cause some pieces of food to stay moist while others become too hard. You might notice this if you see different colors or textures on the same tray. To fix this, always slice your food into even pieces. Place the food in a single layer and leave space between each piece. Rotate trays halfway through the drying process if your dehydrator does not have a fan that moves air evenly. Stir small foods like peas or corn every few hours. If you still see uneven results, try drying smaller batches at a time.
Tip: Check your dehydrator’s airflow and clean the vents often. Good airflow helps every piece dry at the same rate.
Off Flavors or Textures in Dehydrated Food
Sometimes, dehydrated food can taste strange or feel rubbery. This happens for several reasons:
- Drying at high temperatures can cause browning, loss of flavor, or tough textures.
- If you dry food above its glass transition temperature, the structure can collapse and flavors can escape.
- Too much moisture left in the food can make it sticky or chewy.
You can prevent these problems by keeping the drying temperature low and steady. Store your food in cool, dry places to keep flavors fresh. Use airtight packaging to stop air and moisture from getting in. Some people use special drying methods, like freeze-drying, to protect flavors and textures. Try not to rush the process by turning up the heat.
Storage and Spoilage Prevention
Proper storage keeps your dehydrated food safe and tasty for months. Use vacuum-sealed bags to remove air and keep food fresh. Pack food in small containers to limit how much air and moisture gets in each time you open one. Add silica gel packets to absorb any leftover moisture. Store your food away from sunlight and heat. In wet areas, use dry bags to keep water out. If you camp in bear country, use bear canisters or hang your food to keep animals away. Always test your storage method before your trip to make sure your food stays safe.
Note: Combining good drying, packaging, and storage methods helps prevent spoilage and keeps your meals ready for any adventure.
Do’s and Don’ts for Dehydrating Camping Food
Essential Do’s for Success
You can achieve great results with these do’s for dehydrating.
- Choose a quality dehydrator with a thermostat and a reliable fan. This helps you dry food evenly and safely.
- Use multiple trays to dry different foods at the same time.
- Pre-treat vegetables by blanching or steaming. This step stops enzymes that cause spoilage.
- Precook and rinse meats before dehydrating. This reduces fat and prevents rancidity.
- Cut food into small, uniform pieces. Even pieces dry faster and rehydrate better.
- Treat fruits with lemon juice to keep their color bright.
- Store dried foods in airtight or vacuum-sealed containers. This keeps your meals fresh for longer.
- Label and date every package. You will always know what you packed and when you made it.
Tip: Insulate hot foods for at least 20 minutes after dehydrating to lock in quality.
Common Don’ts to Avoid
Avoid these mistakes to keep your dehydrating food safe and tasty:
- Do not overcrowd trays. Overlapping food blocks airflow and causes uneven drying.
- Never dehydrate high-fat foods like cheese or eggs at home. Fatty foods spoil quickly.
- Do not skip pre-cooking lean meats. Always cook to 165°F before dehydrating.
- Avoid slicing food too thick. Thick pieces trap moisture and can spoil.
- Never store dried food in humid or non-airtight containers. Moisture leads to mold and spoilage.
- Do not forget to test meals before your trip. You want to check texture and rehydration.
- Never skip cleaning your dehydrator after each use. Leftover bits can cause bacteria and off flavors.
Note: Following these tips helps you enjoy safe, delicious meals on every adventure.
You improve your dehydrated backpacking meals by slicing food evenly, controlling temperature, and testing texture during rehydration. Try new recipes and adjust water or garnishes to suit your taste. Careful preparation and experimentation help you create safe, delicious dehydrated backpacking meals that make every camping trip more enjoyable.
FAQ
How do you know when food is fully dehydrated?
Check the texture. Fruits should feel leathery. Vegetables should snap. Meats must be dry and firm. Let pieces cool before testing for doneness.
Can you dehydrate cooked meals with the ESIUO?
Yes, you can dehydrate cooked meals. Spread food in a thin layer on trays. Dry until brittle or leathery. Store in airtight containers for best results.
What is the best way to store dehydrated camping food?
Use vacuum-sealed bags or airtight containers. Keep food in a cool, dry, and dark place. Label each package with the date and meal name for easy organization.