You want every meal to taste amazing. The ESIUO electric frying pan helps you do just that. With its clever temperature control, you cook food evenly and never worry about burning. Try it once, and you will see how easy perfect meals can be.
Electric Frying Pan Temperature Control Tricks
Using ESIUO’s Temperature Settings
You get the best results when you use the ESIUO electric frying pan’s smart temperature settings. This pan lets you pick the exact heat you need for every meal. You can trust it to keep the temperature steady, so your food cooks evenly every time. Thanks to even heat distribution, you avoid hot spots and burnt edges. The latest models in 2025 even let you control the temperature with an app, making cooking easier than ever.
Matching Heat Levels to Different Foods
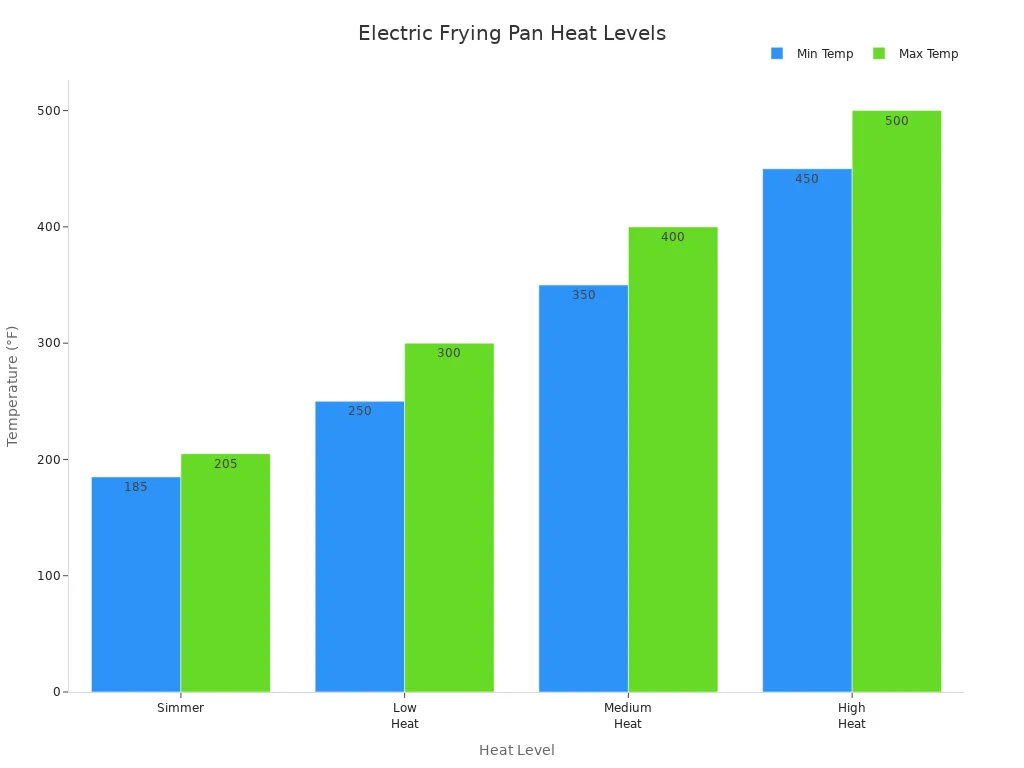
Not all foods need the same heat. Some dishes turn out better with low heat, while others need a hotter pan. Here’s a quick guide to help you match the right temperature to your cooking task:
| Heat Level | Temperature Range (°F) | Foods / Cooking Tasks |
|---|---|---|
| Simmer | 185 – 205 | Delicate sauces, soups |
| Low Heat | 250 – 300 | Slow cooking |
| Medium Heat | 350 – 400 | Sautéing vegetables, pan-frying meats |
| High Heat | 450 – 500 | Boiling liquids |
Step-by-Step Guide for Consistent Results
Follow these steps for perfect cooking every time:
- Preheat your electric frying pan to the right temperature.
- Wait for the pan to reach even heat distribution.
- Add oil or butter after preheating.
- Place your food in the pan and let it cook without moving it too soon.
- Flip or stir only when the food releases easily.
Tip: Always match the pan size to your burner for the best even heat distribution.
Example Dishes: Eggs, Pancakes, Stir-Fries
Eggs need gentle, even heat for a soft texture. Pancakes cook best at low temperature, so they turn golden without burning. Stir-fries need medium heat (350°F to 375°F) for crisp veggies and juicy meat. With the right settings, your electric frying pan makes every meal a success.
Electric Frying Pan Multi-Stage Cooking

Searing, Simmering, and Finishing in One Pan
You can make your meals taste better by using multi-stage cooking in your electric frying pan. Start by searing your food at a high temperature. This step locks in juices and gives you that golden, crispy outside. Next, lower the heat to simmer. This gentle cooking stage keeps your food moist and helps you get healthy results. Finish by raising the heat just enough to melt cheese or crisp up the edges. You do all these steps in one pan, so you save time and keep your kitchen clean.
Multi-stage cooking helps you enjoy healthy home cooking with less oil. The process forms a barrier on the food’s surface, which keeps oil out and moisture in. You get firmer, tastier food with enhanced flavor development and a rougher, more satisfying texture. This method also supports oil-free cooking, making your meals healthier.
Timing and Temperature for Each Stage
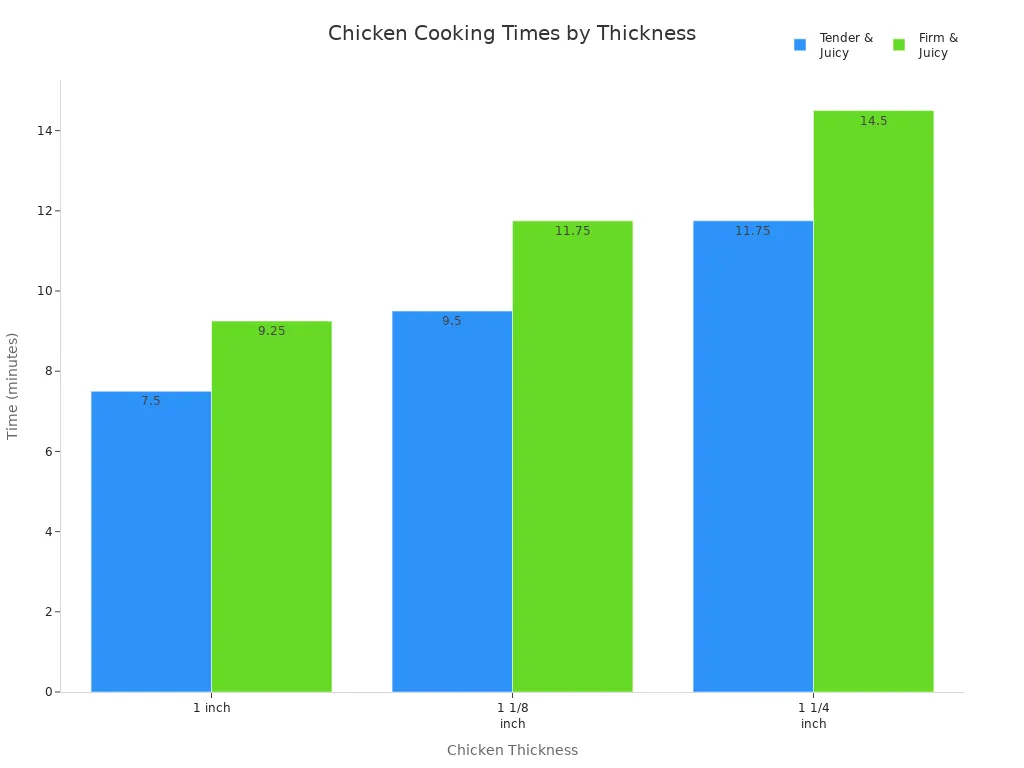
Getting the timing and temperature right is key for healthy home cooking. Here’s a quick guide for cooking chicken in your electric frying pan:
| Thickness | Tender & Juicy (min:sec) | Firm & Juicy (min:sec) |
|---|---|---|
| 1 inch | 7:30 | 9:15 |
| 1 1/8 inch | 9:30 | 11:45 |
| 1 1/4 inch | 11:45 | 14:30 |
Sear your chicken at 400–450°F for a golden crust. Then, simmer at 275–325°F to keep it tender and healthy. Finish at moderate heat to melt cheese or add a final touch.
You can use this timing for other foods, too. Try simmering scalloped potatoes until soft, then finish with cheese for five more minutes. For pot roast, sear all sides, then simmer with veggies and broth. This way, you get healthy, oil-free cooking every time.
Sample Recipes: Chicken, Tofu, and More
You can try many recipes with multi-stage cooking. Here are some ideas:
- Chicken: Sear at high heat, simmer with broth, then finish with a sprinkle of herbs.
- Tofu: Sear cubes until golden, simmer in a healthy sauce, then finish with sesame seeds.
- Muffins or brownies: Preheat your pan at 200°F, then bake at 300°F. Cover the pan for even, oil-free cooking.
- Cornbread: Mix your ingredients, preheat, then bake in the pan. This method gives you healthy home cooking without a regular oven.
Multi-stage cooking in your electric frying pan lets you enjoy cooking with less oil, oil-free cooking, and healthy meals. You get even results, save energy, and make tasty food every time.
Electric Frying Pan Cleanup and Maintenance
Importance of a Clean Cooking Surface
You want your electric frying pan to last and keep making healthy meals. A clean surface helps you avoid burnt flavors and keeps your food tasting fresh. When you skip cleaning, oil and food build up. This can damage the non-stick coating and cause uneven cooking. You might even notice your pan pausing or heating unevenly. Regular cleaning supports healthy home cooking and keeps your oil-free cooking results consistent. If you take care of your pan, you lower the risk of hotspots, safety problems, and expensive repairs. Clean pans also make cooking with less oil easier, so you enjoy healthy meals every time.
Quick Cleaning Steps After Cooking
Cleaning your pan right after cooking makes everything easier. Here’s a simple routine:
- Unplug the pan and let it cool.
- Remove the connector and any detachable parts.
- Wipe away grease and food with a soft sponge and warm, soapy water.
- Wash the lid and drip tray separately.
- Clean the outside with a damp cloth, but keep water away from electrical parts.
- Dry every part completely before putting it back together.
Tip: Never use harsh chemicals or abrasive pads. They can ruin the non-stick surface and make oil-free cooking harder.
Deep Cleaning and Seasoning Tips
Sometimes, your pan needs a deeper clean to keep healthy home cooking on track. Use this table to guide you:
| Step | What to Do |
|---|---|
| Deep Cleaning | Boil water in the pan, let it cool, then empty. Clean with soapy sponge. |
| For tough stains, use baking soda paste and gently scrub. | |
| Rinse and dry well. | |
| Seasoning | After deep cleaning, dry the pan. Heat it on medium-low for 2 minutes. |
| Rub a thin layer of oil over the surface. Heat for 1-2 minutes, then cool. | |
| Wipe off extra oil and dry completely. |
Keep up with regular checks for scratches or loose parts. Store your pan only when it’s dry. This helps you keep enjoying healthy, oil-free cooking and cooking with less oil. You get better results and a longer-lasting pan for all your healthy home cooking needs.
You now know three tricks for perfect meals: temperature control, multi-stage cooking, and easy cleanup. Try these tips for healthy cooking every day. Share your cooking wins or questions below!
- Wonder about noises during cooking?
- Unsure if your pan is safe for healthy cooking?
- Need help with healthy cooking maintenance?
Let’s keep cooking healthy together!
FAQ
How do you stop food from sticking to your electric frying pan?
Make sure you preheat the pan. Add a little oil or butter before cooking. Clean the surface after each use for best results.
Can you cook without oil in the ESIUO electric frying pan?
Yes, you can! The non-stick surface lets you cook eggs, pancakes, or veggies with no oil. You get healthier meals every time.
What should you do if your pan heats unevenly?
- Check for leftover food or oil on the surface.
- Clean the pan well.
- Make sure the pan sits flat on your counter.