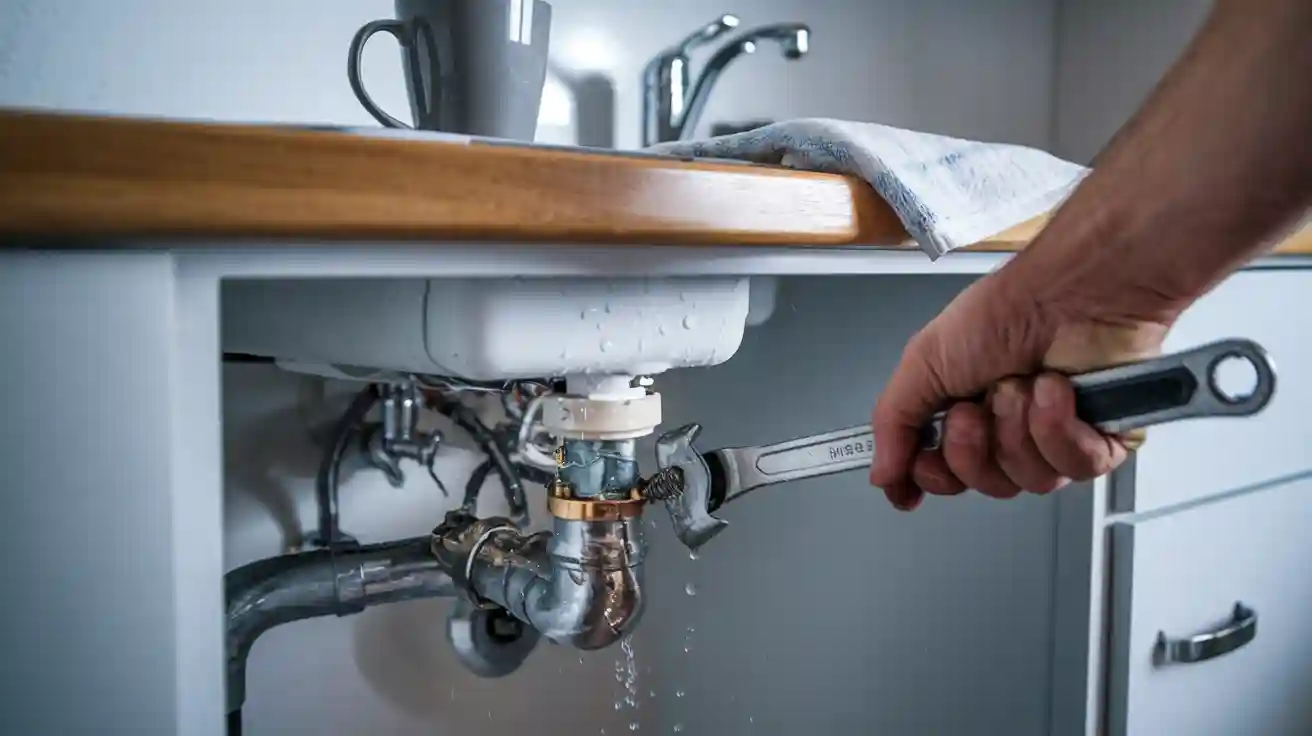
You notice water under the sink. A food disposal leaking can make a mess fast. If you spot a leak, don’t panic. Most times, a leaky garbage disposal just needs a quick fix. You can track down the leaking spot and stop the leak before it gets worse.
How to Find the Source of Food Disposal Leaking
If you want to fix a leaky garbage disposal, you need to identify the source of the leak first. A systematic approach to troubleshooting helps you spot the problem quickly. You can use a few simple methods to check for leaks and figure out what’s wrong.
Visual Inspection for Leaking
Start with a good look under your sink. Grab a flashlight and shine it around the garbage disposal. You might see water puddles, wet spots, or even dripping water. These signs point to a leaking garbage disposal.
Here’s what you should do:
- Put on safety glasses to protect your eyes.
- Use towels or a bucket to catch any water.
- Look at the sink flange, the area where the disposal connects to the sink. Loose mounting bolts or failed plumber’s putty often cause leaks here.
- Check the discharge pipe and the dishwasher hose. These spots are common sources of food disposal leaking.
- Inspect the body of the disposal for cracks. If you see a crack, you probably need a new unit.
Tip: An adjustable wrench helps you tighten any loose connections you find during your inspection.
The Food Coloring Trick to Spot Leaks
Sometimes, leaks hide in tricky places. The food coloring trick makes it easier to spot them.
Follow these steps:
- Add a few drops of food coloring to a cup of water.
- Pour the colored water into the sink drain while the disposal is off.
- Watch closely. If you see colored water appear anywhere under the sink, you’ve found the leak.
This method works well for finding leaks around the sink flange, dishwasher connection, or discharge pipe. You can use this trick to confirm the exact spot before you start repairs.
Note: The food coloring test is accurate and helps you identify the source of the leak without guessing.
Checking Connections for Garbage Disposal Leaking
Loose or worn-out connections cause many garbage disposal leaking problems. You need to check each connection point carefully.
Here’s a quick checklist:
- Look at the seal around the disposal. Seals wear out over time and start leaking.
- Check mounting bolts, hose clamps, and drain connections. Tighten anything that feels loose.
- Inspect the dishwasher hose. Run the dishwasher and watch for leaks at the hose connection.
- Examine the drain line. Worn screws or damaged rubber gaskets can let water escape.
- Look at the reset button area and the bottom of the disposal. Leaks here often mean the internal seal has failed.
If you find a crack in the disposal body or a clogged drain line, you may need to replace parts or the whole unit.
By following these steps, you can troubleshoot a leaky garbage disposal and fix most problems yourself.
How to Fix a Leaking Garbage Disposal at the Top
If you see water dripping from the top of your garbage disposal, you probably feel frustrated. You want to know how to fix a leaking garbage disposal without calling a plumber. The good news is, you can often fix this problem yourself. Let’s walk through the steps to fix a leaking garbage disposal at the top.
Tightening the Mounting Assembly
When you spot a leak under your kitchen sink, you might notice water pooling around the base of the disposal. This often means the mounting assembly is loose. The mounting assembly connects the disposal to the sink and plumbing. If it isn’t tight, water can escape and cause a mess.
Here’s how you can fix it:
- Unplug the garbage disposal to stay safe.
- Use a flashlight to check the mounting ring at the top of the disposal.
- Grab a screwdriver or wrench and tighten the mounting bolts. Turn each bolt a little at a time so you don’t crack the sink flange.
- Wipe away any water and check if the leak stops.
Tip: If you still see leaking after tightening, the problem might be with the gasket or the seals.
A loose mounting assembly is a common reason for a leaking garbage disposal. Tightening the bolts can fix the leak and prevent water damage.
Replacing the Sink Flange Gasket
If tightening the mounting assembly doesn’t fix the leak, you might need to replace the sink flange gasket. The gasket sits between the sink and the disposal. Over time, it can wear out or crack, causing leaks.
Follow these steps to fix a leaking garbage disposal by replacing the gasket:
- Disconnect the disposal from the power source.
- Remove the disposal unit by twisting it off the mounting ring.
- Take out the old gasket and inspect it for cracks or damage.
- Place a new gasket on the sink flange.
- Reattach the disposal and tighten the mounting bolts.
Note: Always use a gasket that matches your disposal model. A good gasket helps keep the seals tight and stops leaks.
Replacing the gasket is a simple way to fix a leaking garbage disposal. You don’t need special tools, just a little patience.
Resealing with Plumber’s Putty
Sometimes, the leak comes from a bad seal around the sink flange. Plumber’s putty helps create a watertight seal. You want to use the right type of putty for your disposal.
- Regular plumber’s putty works well for metal sink flanges.
- You don’t need to wait for it to cure before mounting the disposal.
- When you tighten the flange bolts, extra putty squeezes out. You can wipe it away.
- If your disposal has plastic parts, use a stain-free plumber’s putty. Regular putty can stain or damage plastic.
- Stain-free putty, like Oatey® Stain-Free Plumber’s Putty, keeps plastic parts safe and seals the flange.
Here’s how you can fix the leak with plumber’s putty:
- Remove the disposal and clean the sink flange.
- Roll the putty into a rope and press it around the flange.
- Reinstall the flange and tighten the bolts.
- Wipe away any extra putty.
Alert: Plumber’s putty is not for pressurized connections. Only use it to seal the sink flange.
When you reseal with plumber’s putty, you help keep the seals strong and prevent future leaks. This step is key if you want to know how to fix a leaking garbage disposal and keep your kitchen dry.
If you follow these steps, you can fix a leaking garbage disposal at the top and stop water from dripping under your sink. You don’t need fancy tools or special skills. Just a little time and care will help you fix the leak and keep your kitchen safe.
Fix a Leaking Garbage Disposal at the Side
When you see water dripping from the side of your garbage disposal, you might feel frustrated. Don’t worry. You can fix most side leaks with a few simple steps. Let’s look at the most common reasons for a leaking disposal at the side:
- Erosion or loosening of the main drain line at the flange.
- Leaks in the dishwasher drain pipe.
- Worn rubber gaskets inside the joints.
These problems let water escape from the side of the unit. Now, let’s go through how to fix each one.
Tightening Drain Pipe Connections
Loose connections on the drain pipes often cause leaks. You should check the main drain line where it connects to the disposal. Use a wrench or pliers to tighten the slip nuts and screws. If you see water around the joint, wipe it dry and watch for new drips. Sometimes, the rubber gasket inside the joint wears out. If tightening does not stop the leak, replace the gasket. This step is a big part of how to fix a leaking garbage disposal.
Tip: Always check for loose connections after running water through the disposal.
Replacing the Dishwasher Hose Clamp
Many disposals connect to a dishwasher drain hose. This spot is a common leak point. If you see water pooling near the hose, the clamp may be loose or worn out. Tighten the metal clamp with a screwdriver. If the leak continues, replace the clamp or the hose. Old hoses can crack and split, making leaks worse.
- Tighten the clamp screws.
- Replace the clamp if it looks rusty or damaged.
- Swap out old hoses if you see cracks.
Checking for Cracked Pipes
Sometimes, pipes or hoses develop cracks. Run water and watch for leaks along the pipes. If you spot a crack, you need to replace that section. Cracked pipes will keep leaking until you fix them. New pipes or hoses are easy to find at hardware stores.
Note: Regular checks help you catch leaks early and avoid bigger problems.
Garbage Disposal Leaking from the Bottom
If you see water leaking from the bottom of your garbage disposal, you might feel worried. This type of leak often means you have worn or damaged seals inside the unit. Let’s walk through how you can identify a bottom leak and what steps you should take next.
Inspecting for Internal Seal Failure
When your garbage disposal is leaking from the bottom, the problem usually starts with worn or damaged seals. These seals keep water inside the unit. Over time, the rubber gasket can wear out or break. You might notice water dripping right from the bottom of the disposal, not from the sides or top.
To check for internal seal failure, follow these steps:
- Turn off the power and water before you start.
- Loosen the mounting bolts and carefully remove the disposal unit.
- Look at the shell for cracks or damage.
- Check the rubber gasket at the top. If it looks worn or damaged, replace it.
- Put the disposal back, tighten the bolts, and lock the grooves.
- Reconnect everything, then run water and the disposal to see if it still leaks from the bottom.
Tip: If you still see leaking from the bottom after replacing the gasket, the internal parts may be too damaged to fix.
When to Replace the Disposal Unit
Sometimes, you can’t fix a garbage disposal that is leaking from the bottom. If you keep having leaks or if the seals are badly worn or damaged, it may be time for a new unit. Here are signs you should replace your disposal:
- Repair costs are more than half the price of a new unit.
- The disposal is over 8-10 years old and keeps leaking from the bottom.
- You see cracks in the housing or the motor fails.
- You have to fix it often, or it makes loud noises and grinds poorly.
Newer models work better, use less energy, and last longer. If you notice frequent leaking from the bottom or worn or damaged seals, replacing the disposal saves you time and money in the long run.
Safety Tips for Fixing a Leaking Garbage Disposal
Electrical Safety Precautions
When you work on a leaking garbage disposal, safety comes first. Electricity and water do not mix. You want to avoid shocks or injuries. Here are some simple steps to keep you safe:
- Always turn off the power before you start any repairs. Unplug the disposal or switch off the breaker.
- Never put your fingers or tools inside the disposal, even if it is off. The blades stay sharp and can cut you.
- Watch out for water near electrical outlets or wires. Wet areas can cause electric shock.
- If your disposal is old or looks worn, it may have electrical problems. Replace it instead of trying to fix it under strain.
- If you do not feel sure about your skills, call in a professional plumber. They know how to handle repairs safely.
Tip: Double-check that the power is off before you touch anything under the sink.
Signs You Need Professional Help
Sometimes, troubleshooting a leak is not enough. Some problems need expert care. You should look for these warning signs:
- Water leaks under the disposal or sink area. This can mean damaged seals, loose connections, or cracks in the housing.
- Even small leaks can cause big damage to cabinets and floors.
- If you see water pooling or feel unsure about repairs, get professional help.
- Leaks from the bottom or around the sink connection often mean serious problems. These can come from loose seals, cracks, or plumbing issues.
- Trying to fix these leaks yourself can make things worse or cause injury. A professional plumber can find and fix the problem fast.
Note: If you notice water around your disposal, do not wait. Call a plumber to prevent costly damage.
Preventing Food Disposal Leaking in the Future
Regular Maintenance Tips
You want your garbage disposal to last and avoid messy leaks. Good habits and regular care make a big difference. Here are some easy tips you can follow:
- Run cold water before, during, and after using the disposal. Cold water helps solidify grease and flushes food particles away.
- Feed food scraps slowly. Break large pieces into smaller chunks. This keeps the motor from straining and helps prevent jams.
- Clean your disposal every two weeks. Drop in ice cubes and a handful of salt, then run the unit. This scrubs the blades and removes stuck food.
- Use baking soda and vinegar to fizz away buildup. Citrus peels can help freshen the smell.
- Inspect seals and mounting bolts often. Tighten anything loose and look for signs of wear.
- Let the disposal air dry overnight after use. This helps stop mold and rust.
- Schedule a deep clean once a month. Scrub the splash guard and flush with soapy water.
Tip: Regular cleaning and inspections help you catch small problems before they turn into a food disposal leaking disaster.
What Not to Put Down the Disposal
Some things just don’t belong in your garbage disposal. Putting the wrong items down the drain can cause clogs, jams, or even cracks that lead to leaks. Here’s what you should always keep out:
- Fats, oils, and grease (these can harden and block pipes)
- Bones and fruit pits (too hard and can break parts)
- Fibrous foods like celery, corn husks, or onion skins (they wrap around blades)
- Coffee grounds and starchy foods like pasta or rice (they swell and clog pipes)
- Glass, metal, rubber, or plastic (never put these in!)
If you avoid these items, you protect your disposal from damage and leaks. Regular checks and smart habits keep your kitchen running smoothly.
Fixing a leaking food disposal saves you money—repairs usually cost $80–$180, while replacement can hit $550. Quick action keeps your kitchen safe from water damage.
Tip: Regular checks and smart habits, like using cold water and avoiding grease, help you prevent leaks and keep your disposal running strong.
FAQ
How do you know if your garbage disposal is leaking?
You might see water under the sink or notice a musty smell. Sometimes, you find puddles or hear dripping. Check for wet spots around the disposal.
Can you use your sink if the garbage disposal is leaking?
You should avoid using the sink until you fix the leak. Water can damage cabinets and floors. Fix the leak first to prevent bigger problems.
What tools do you need to fix a leaking garbage disposal?
You usually need a screwdriver, adjustable wrench, plumber’s putty, and replacement gaskets. Keep towels and a flashlight handy. Most repairs use basic tools you already have.